

How To Repair A Husky Generator Make No Electrie
Introduction
Sticking to a consequent style guide is something that we all dearest doing as programmers. Whether it's spaces instead of tabs, double quotes instead of single, or putting your {'s on a new line (if you are a savage).
Sometimes, however, we can slip up and let small differences in our styling exist throughout our codebase. The problem arises when codebases become bigger and bigger over time, and small-scale inconsistencies sneakily add upwardly over the years.
In this guide I'one thousand going to run through how you can:
- Setup your Next.JS projects using Typescript, ESLint, Prettier, and Husky.
- Lint and format your code to align to the manner rules you defined in config.
- Automobile-format and auto-way your lawmaking whenever you click save.
- Cheque if your lawmaking meets all of your mode rules earlier you
git commit. - Use and extend Google's Typescript mode guidelines.
For video lovers
If you prefer to watch your content, or you're feeling a bit likewise sleepy to read 😴, I've also fabricated this guide into a video tutorial, you can observe that here
Goal
At the cease of the guide, you lot'll have a project that uses Next.JS and TypeScript to enforce Google's Typescript mode guidelines when it comes to linting and formatting.
Guide
Creating the Next.JS App
Firstly nosotros'll need to initialize a new Next.JS application. Run the following command from the command line to practice-so:
npx create-next-app code-similar-google Now, let'south change directory into your newly created Next app.
cd code-similar-google And open it up in Visual Studio Lawmaking!
lawmaking . Cleaning up the example code
To make clean upward the case code provided by the create-next-app control, go ahead and:
- Delete the
apibinder and information technology's contents - Delete
_app.js
Setting upwards TypeScript
Next.js provides an integrated TypeScript experience out of the box, similar to an IDE.
To get started, create an empty tsconfig.json file in the root of your projection.
And so run npm run dev from your command line.
shocked pikachu an error comes upwards!
Not to worry, we just need to install some packages to brand it piece of work. Run npm install --salvage-dev typescript @types/react @types/node
Now nosotros can become back and alter our alphabetize.js file to index.tsx, and run npm run dev again.
Next.js will automatically configure the tsconfig file with default values for Side by side.JS.
Let's alter the tsconfig.json file a trivial bit to match Google's standards. Modify it to the below:
{ "compilerOptions": { "allowJs": true, "allowUnreachableCode": false, "allowUnusedLabels": false, "declaration": truthful, "esModuleInterop": true, "forceConsistentCasingInFileNames": true, "isolatedModules": true, "jsx": "preserve", "lib": ["dom", "dom.iterable", "esnext"], "module": "esnext", "moduleResolution": "node", "noEmit": true, "noFallthroughCasesInSwitch": true, "noImplicitReturns": true, "pretty": truthful, "resolveJsonModule": true, "skipLibCheck": true, "sourceMap": true, "strict": true, "target": "es2018" }, "include": ["side by side-env.d.ts", "**/*.ts", "**/*.tsx"], "exclude": ["node_modules"] } Slap-up! We are done setting up TypeScript, feel free to hover over each of these values to notice out more nigh what they do or notice out more on this document.
Setting up ESLint
What is ESLint?
ESLint statically analyzes your lawmaking to rapidly find problems. Many problems ESLint finds can be automatically stock-still. ESLint fixes are syntax-aware so you won't feel errors introduced by traditional find-and-replace algorithms.
In uncomplicated terms, ESLint makes suggestions for you to avoid bugs in your code, for example, suggesting that yous add a return type to functions that don't have i, or recommending you remove console.log statements.
A total list of ESLint rules tin exist found here.
Some issues that ESLint finds are "auto-fixable", and later, we'll be configuring ESLint to fix everything it can figure out itself whenever hit save.
To install ESLint, run
npm install eslint --salvage-dev And then to configure ESLint, run:
npx eslint --init Beneath are the settings that I chose to utilise in this guide, yous tin either choose to follow these settings or configure your own rules according to your personal preferences.
# Interactive ? How would you like to apply ESLint? ... > To check syntax, notice issues, and enforce code style ? What type of modules does your project use? ... > JavaScript modules (import/consign) ? Which framework does your projection use? ... > React ? Does your projection employ TypeScript? » Yes ? Where does your lawmaking run? ... √ Browser ? How would you similar to define a mode for your projection? ... > Apply a popular fashion guide ? Which manner guide do you want to follow? ... > Google: https://github.com/google/eslint-config-google ? What format practice you want your config file to be in? ... > JavaScript eslint-plugin-react@latest @typescript-eslint/eslint-plugin@latest eslint-config-google@latest eslint@>=5.xvi .0 @typescript-eslint/parser@latest ? Would you lot like to install them at present with npm? » Yeah What just happened?
Nosotros've installed a number of npm packages to configure ESLint to lint TypeScript code and also extended eslint-config-google to copy Google's linting rules.
You lot tin can take a look at what we created in the .eslintrc.js file. ESLint volition look for eslintrc.* files and employ them to enforce the rules that you have specified in the file.
If you followed the above example, we are extending Google's ruleset.
Side Note: During this step, I encountered a weird problems where react version was non being detected. I appended the following lawmaking inside my module.exports in eslintrc.js to resolve it:
settings: { react: { version: "latest", }, }, Setting up Prettier
Prettier is a code formatter.
It removes all original styling and ensures that all outputted lawmaking conforms to a consistent manner.
It'll do things like adding a semicolon to the end of every argument, or make sure your indentation is consistent.
To install prettier, run:
npm install --salvage-dev --save-exact prettier To avert format conflicts between ESLint and Prettier, nosotros'll also need this parcel, chosen eslint-config-prettier. It turns off all ESLint rules that are unnecessary or might conflict with Prettier.
npm install --save-dev eslint-config-prettier One terminal matter to make Prettier cooperate with ESLint; add "prettier" to the extends array in your eslintrc.js file. And then it now should await like this:
extends: ["plugin:react/recommended", "google", "prettier"], Brand sure to put it terminal, so it gets the chance to override other configs.
To customize Prettier, create a .prettierrc file in the root of your directory.
Let's configure Prettier with the following in our .prettierrc file:
{ "endOfLine": "lf", "printWidth": 80, "tabWidth": two, "trailingComma": "es5" } Bonus: .prettierignore and .eslintignore
Similarly to .gitignore we can configure both ESLint and Prettier to ignore formatting or linting certain files or directories.
I set both of these files to the below:
.next side by side-env .d .ts node_modules yarn .lock package-lock .json public Configuring Visual Studio
Install Extensions
Inside Visual Studio, in that location are extensions for both ESLint and Prettier
Install both of these extensions in Visual Studio Code. (Ctrl + Shift + X to open up the extensions window in Visual Studio Lawmaking.)
Configuring Preferences
To configure these extensions on a User level, go to File > Preferences > Settings or hit Ctrl + ,
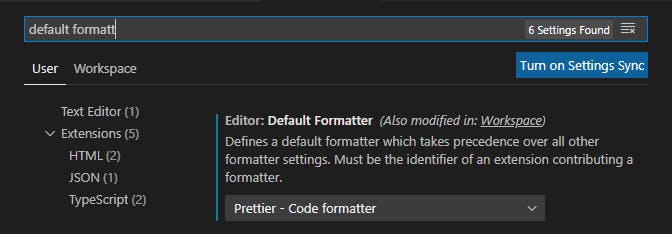
Search "default formatter" in the search bar, and Editor: Default Fromatter to Prettier - Code formatter
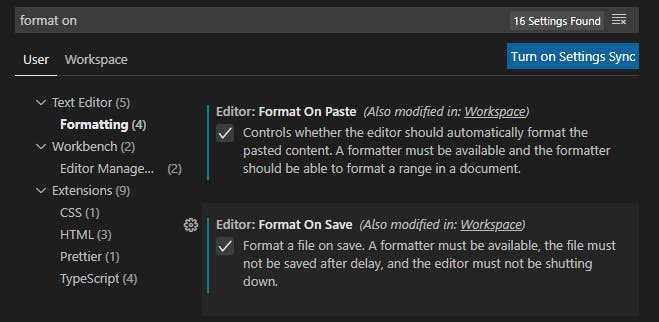
Next, search "format on" in the search bar, and tick Editor: Format on Paste, and Editor: Format on Save.
To test if everything worked, go to alphabetize.tsx and press Alt + Shift + F. (you may be given an pick to select default formatter here, select Prettier)

If we've gear up everything up correctly it should auto-format your code.
(You may demand to restart VS Code).
If you're following along with the guide, ESLint will have a few things to say about our index.tsx file.
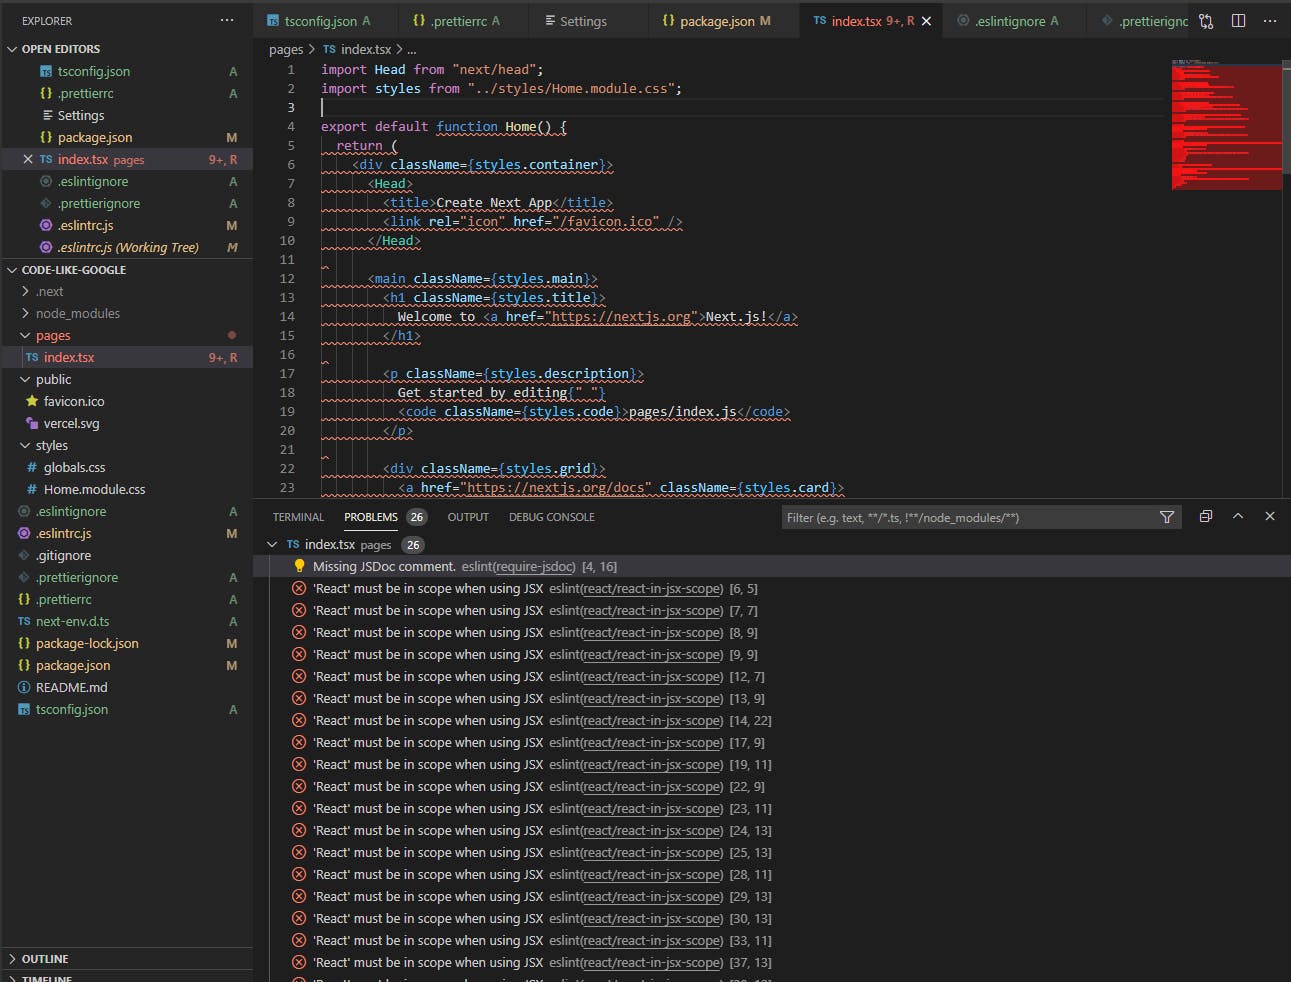
Non to worry, all that information technology'south saying is that nosotros need 2 things:
- React imported if we desire to employ JSX
- A JSDoc Comment to explain what the function does.
at the top, add :
import React from "react"; /** * Home: The Landing page of the spider web app * @return {JSX.Element} The JSX Lawmaking for the Home Page */ Formatting on save
We've implemented our standards and both ESLint and Prettier are going to help us stay consistent, simply when there are auto-fixable problems ESLint tin can implement, I want them to be implemented whenever I hit salvage.
To achieve this, we can modify our VS Code settings for this projection.
- Create a
.vscodefolder at the root of your directory - Inside that binder, create a
settings.jsonfile. - Change your
settings.jsonto:{ "editor.formatOnPaste": true, "editor.formatOnSave": true, "editor.defaultFormatter": "esbenp.prettier-vscode", "editor.codeActionsOnSave": { "source.fixAll.eslint": truthful, "source.fixAll.format": true } }
This is going to beginning lint, and so format all of our code every fourth dimension we striking salvage. It'due south too enabled formatting code on pasting lawmaking into our files and ready Prettier equally the default formatter for this project.
Using husky to run checks on git commit
We are going to be using husky to perform the post-obit whenever a git commit is made:
- Cheque in that location are no Prettier warnings on our code.
- Check there are no ESLint warnings on our code.
- Check there are no errors compiling our code from TypeScript.
- Check nosotros can build our project using
next build
To install croaking, run:
npx husky-init then
npm install This will prepare up husky, modify parcel.json, and create a sample pre-commit claw that we are going to modify.
Firstly, let's modify package.json to add some scripts for what we would like to check.
In packet.json, I accept the following scripts:
"scripts": { "dev": "adjacent dev", "build": "adjacent build", "start": "next start", "check-types": "tsc --pretty --noEmit", "cheque-format": "prettier --check .", "check-lint": "eslint . --ext ts --ext tsx --ext js", "format": "prettier --write .", "examination-all": "npm run check-format && npm run check-lint && npm run cheque-types && npm run build", "prepare": "croaking install" }, To summarise:
- bank check-types runs TypeScript'southward
tscCLI command and pretty prints any warnings/errors. - check-format asks Prettier to bank check all of our files (excluding the ones in .prettierignore) for formatting issues.
- check-lint asks ESLint to cheque for any linting warnings/errors on an .ts, .tsx or .js files.
- format tells prettier to automatically re-write all of our files with proper formatting
- test-all runs a number of the above commands in sequence.
Editing the pre-commit hook
The pre-commit hook that is created when we initialized husky does exactly what information technology says; it runs prior to executing a git commit.
For example, if you lot run a git commit control, this script would run start, and so on its success, a commit would exist executed. If the pre-commit claw fails, the commit does not go through.
This is what I've fabricated the pre-commit script to contain:
#!/bin/sh . "$(dirname "$0")/_/husky.sh" echo '🏗️👷 Styling, testing and edifice your project before committing' # Cheque Prettier standards npm run cheque-format || ( repeat '🤢🤮🤢🤮 Its F**KING RAW - Your styling looks icky. 🤢🤮🤢🤮 Prettier Cheque Failed. Run npm run format, add changes and effort commit again.'; false; ) # Check ESLint Standards npm run check-lint || ( echo '😤🏀👋😤 Become that weak s**t out of here! 😤🏀👋😤 ESLint Check Failed. Make the required changes listed above, add changes and try to commit again.' imitation; ) # Bank check tsconfig standards npm run check-types || ( echo '🤡😂❌🤡 Failed Type check. 🤡😂❌🤡 Are you seriously trying to write that? Make the changes required in a higher place.' faux; ) # If everything passes... Now we can commit repeat '🤔🤔🤔🤔... Alright... Lawmaking looks practiced to me... Trying to build now. 🤔🤔🤔🤔' npm run build || ( echo '❌👷🔨❌ Better call Bob... Because your build failed ❌👷🔨❌ Next build failed: View the errors in a higher place to run into why. ' false; ) # If everything passes... Now we can commit repeat '✅✅✅✅ You win this fourth dimension... I am committing this now. ✅✅✅✅' I similar to have a footling fun with my messages as y'all tin can see... In a nutshell, all nosotros are maxim in this file is, earlier a commit:
- Bank check Prettier standards looks good (otherwise fail commit)
- Bank check ESLint standards looks good (otherwise fail commit)
- Check tsconfig standards looks good (otherwise fail commit)
- Effort produce a
next build(otherwise fail commit)
Conclusion
That's it! Now every time we save our file we'll motorcar-lint and auto-format. Not only that, every fourth dimension we attempt to make a commit to git, we commencement accept to laissez passer a serial of tests and confront the gauntlet of being roasted by our ain emojis!
Thank you for reading!
Find me at:
Buy me a coffee ☕
YouTube: youtube.com/channel/UCJae_agpt9S3qwWNED0KHcQ
Twitter: twitter.com/JarrodWattsDev
GitHub: github.com/jarrodwatts
LinkedIn: linkedin.com/in/jarrodwatts
Website: jarrodwatts.com

Source: https://blog.jarrodwatts.com/nextjs-eslint-prettier-husky
Posted by: simontonalaines.blogspot.com
0 Response to "How To Repair A Husky Generator Make No Electrie"
Post a Comment